• Skip to primary navigation
  • Skip to main content
  • Skip to primary sidebar
  • Skip to footer

Create Scout

We scout around to find and share creative ideas to inspire you to create

  • About
    • Contact
  • One Sheet Wonder – Full Die System™
    • One Sheet Wonder -6×6
    • One Sheet Wonder – 6×6 Add-On
  • Create Scout Blog
  • Tutorials
  • Resources

Paper Crafts

Organize Your Craft Room With A Rolling Craft Cart

January 7, 2022 By Lynn Leusch 1 Comment

Getting organized is a year-round desire of many and it is especially a hot topic at the beginning of a new year. Likely because of the resolutions made by those who resolve to themselves to get organized.

With the new year comes lots of good deals on organizational containers. Lots of tools are available (year-round) for the crafter to get themselves organized and to help them become more productive and happy creators.

I enjoyed reading an article from refinedrooms.com about the 10 key benefits of being organized. Of course, all 10 of the benefits are valuable to keep in mind, but for the purposes of our craftiness, there are 3 benefits that stood out to me that getting and being organized could help us in our creative life.

Reduces Stress
“Once you begin to clear clutter and put organizing systems in place, you’ll feel lighter and more in control of your life. That peace of mind you’ve been craving can finally be realized.“
– refinedrooms.com

Makes You More Productive
“Putting some simple organizing systems and routines in place enables you to get more done in less time.“
– refinedrooms.com

Enhances Creativity
“You gain clarity and experience a surge of physical and mental energy that opens up opportunities for your creative spark to ignite.”

Makes You More Productive
“Putting some simple organizing systems and routines in place enables you to get more done in less time.“
– refinedrooms.com

The process of organizing a craft room can indeed be overwhelming, so for our time together today I thought it would be fun to start with a very simple step. I’m talking about organizing a small section of your crafting area that allows you to access the essential tools and supplies that can help with your creative productivity.

Rolling Craft Carts

I remember when I was first introduced several years back, to a little rolling cart that had been perfectly organized with little trays that allowed for the essential crafting tools to be ready and at hand when needed. It had wheels that made it perfect to roll right next to the crafting table or even roll it to an area that had limited space.

I immediately knew that this little cart on wheels could somehow add some happiness to my frustration of being a bit unorganized or able to find things when I needed them. I was in love.

These carts can certainly be used in any room in the home. I now have many rolling carts throughout different rooms in my home and very specifically in my craft room.

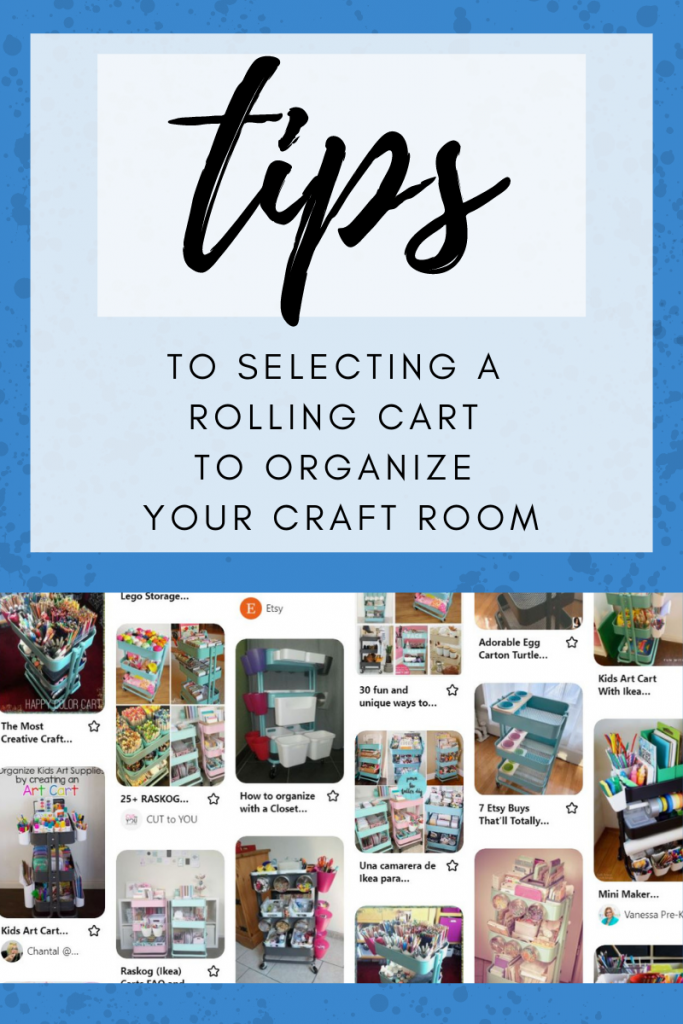
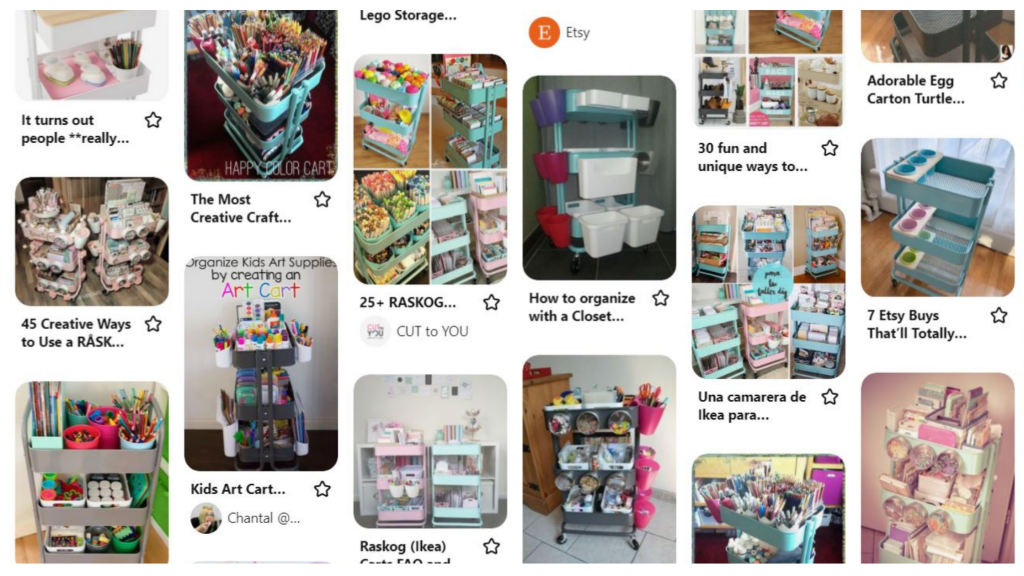
I am always inspired by how others make use of the purchases they make and this little cart is no exception. I have a fun Pinterest Board just on Rolling Craft Carts alone.

If you’d like to get inspired as well, please check it out.

Selecting Your Craft Cart

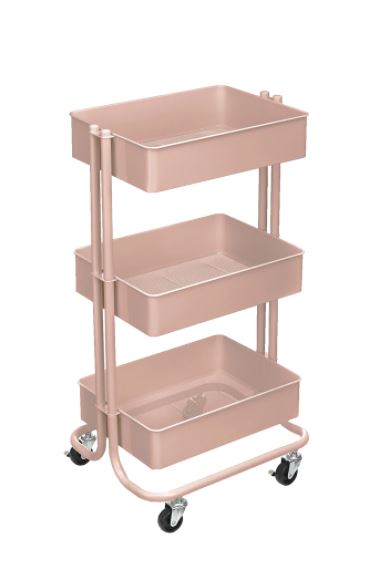
Since that moment in time several years back, that little rolling cart is now readily available at many of the crafting retail stores. Of course, there are many different rolling carts that are now available to organize all of our tools and trinkets that so desperately need to get organized.

Many retail stores now have this readily available to purchase.

Ikea
Michaels
Amazon

ikea.com
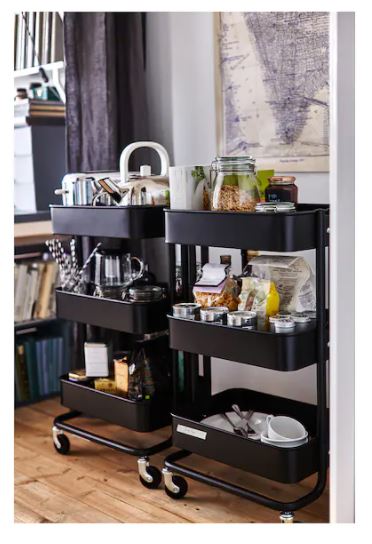
I believe Raskog from Ikea was the original rolling cart that I was introduced to and it is still a top seller.

michaels.com
The Lexington 3-tier Rolling Cart by Simply Tidy is the brand I now have purchased. It is considered a special buy purchase and is not available to be purchased using a coupon, but it is at a really good price point all the time. I like that Michaels has a variety of different rolling cart brands in multiple sizes and price ranges.

amazon.com
It’s likely not a surprise that Amazon has carts that you can easily purchase and have delivered directly to your door (though other companies have delivery as well). Amazon is not always the least expensive, but it does have a very nice selection to choose from to either do research all in one place and or to pick one up that you can’t find elsewhere.

target.com
Many of the options available at Target are only available for shipping. That doesn’t mean it needs to be a deal-breaker, because often you can get free shipping.

homedepot.com
Don’t discount home improvement stores to locate a cart that will work well for your needs and your budget. Though I am mostly pointing out the smaller craft carts, I enjoy using an actual tool cart as one of the carts I have in my craft room, because of the drawers and layout it has available. And because I told my husband I needed the one he had in my craft room and he loves me enough to say yes. LOL!

Doing a little bit of research with your needs in mind will help you to pick out the best rolling craft cart for your needs.

Organizing Your Cart

If you are either re-organizing a cart you already have or starting to fill a new one for the first time, it’s important to have a plan so it doesn’t get messy quickly. That’s not to say that, that won’t happen in the future, but just putting things in the cart without a plan will only lead to still being unorganized.

There are so many little things you can do to keep your cart in order.
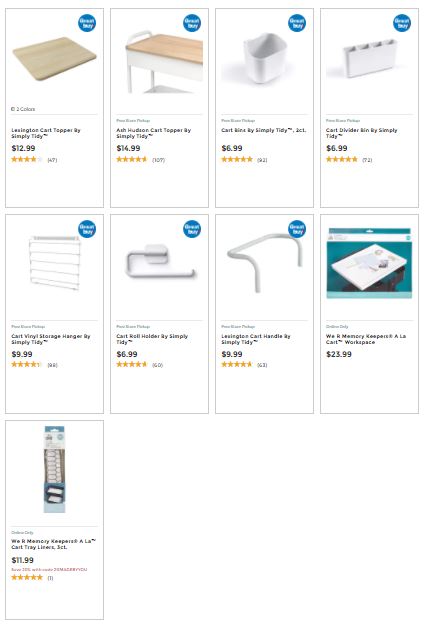
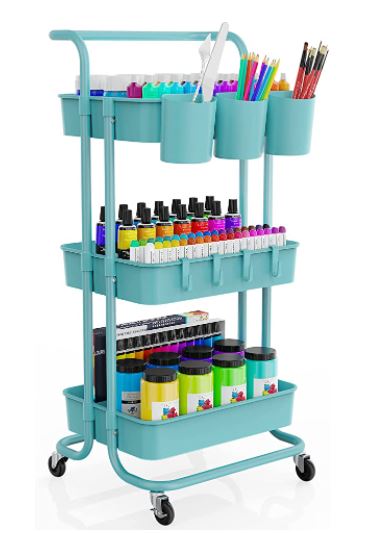
Cart Accessories
Since these rolling carts have become so very popular there are many cart accessories that can be found that are specifically made to attach to the carts. Take a look at them. They can really go a long way to help keep you organized. You can see a lot of great examples if you look at the Pintetrest page I created and posted earlier that showcases many of these add-ons.

Organization Tools
Totally Tiffany is a wonderful place to find little carrying castes and more that can host your pencils, washi tapes, and more that would make it so easy to place into your cart and easily retrieve them when needed.

Jars, Mini Totes, And More
I
‘ve seen oodles of ways you can keep your rolling craft cart organized. Using baby jars, little bags, pencil holders, totes etc. All of which can be found at almost any shopping outlet. Because the carts are metal you can also find fun tins with magnets on the back that can simply attach to the outside of your cart to give you even more space.

The important thing is, is to keep like-minded items together and not rolling around. You want to be able to easily access all of your items when needed.

Whether or not you already have a rolling cart that you are using in your craft area or are looking to add one or more, I hope these tips inspire you to get your craft space organized.

Filed Under: Paper Crafts

Card Making Made Easy

January 6, 2022 By Lynn Leusch 4 Comments

I have fully come to the realization that I LOVE simple and easy card making. Oh yes, every once in a while I enjoy working on a special card project that takes a bit more of my love and time. However, if your schedule is as busy and limited like mine, then I imagine that you likely enjoy simple as well. Am I right?

Let me be clear…simple does not mean that there is a lack of love, beauty, and thoughtfulness that goes into the card making.

The more I play with my One Sheet Wonder – Full Die System™ that I introduced to you all in August 2021, the more I fall in love with it. Click the link above if you’d like to learn more about this Crafters Best Friend.

During the holidays I was able to easily whip out many cards in no time at all using this unique die system.

I know the 2021 holidays are over, but below is a sampling of the cards I quickly and easily made using my OSW dies.

These Halloween cards were made using the OSW die system with two different paper prints and coordinating cardstock, along with the sentiment sheet. With this little amount of product, I created 14 cards. Yes, you read that correctly, 14 cards!

I also made slimline cards by selecting different paper but used all the same paper pieces that are cut using the die system. I tell you, it truly is such a fun and addictive card-making system.

Then Came Christmas Card Making

Oh my goodness…Christmas Card making was never easier.

I love the new plaid print that came out in December 2021.

Mechele, from The Stamp Doctor created new prints and sentiment sheets just in time for Christmas and once again, I made more cards. Look at these adorable cards below. Just simpy changed the plaid print from red to blue and green as well.

What’s additionally cool is that these and all of the available prints are now available in print format shipped directly from The Stamp Doctor to your door, as well as in digital format that you can print on your own.

I ended up having extra sentiment pieces from the sentiment sheets that were newly created, which I absolutely love. With these extra sentiment pieces, I simply punched a hole in the corner and added a pice of coordinating twine. I added the to and from on the backside of the tags. They were noticably adorable on all the packages I added to for everyone’s presents.

New Year – New Prints

Card making season is 365 days long, so being able to whip out a variety of cards in a shorter amount of time is very appreciative.

The busy holiday season is over and we have now entered into a New Year, and I’m excited for the new paper prints and sentiment sheets that The Stamp Doctor will be launching in the days and months ahead for the One Sheet Wonder – Full Die System™ .

Want a peek of what’s waiting for you to create with in the TSD shop? I knew you did… (smile).

The Buffalo Plaid Valentine’s OSW papers comes in red and pink. All of The Stamp Doctor (TSD) prints are available in print, digital, and card kit formats.

The paper pack collections give you a nice varieity of prints to work with.

I will be making my Valantine cards soon and share them with you.

I hope you can see how the One Sheet Wonder – Full Die System™ can make your card making super simple and easy and save you lots and lots of time.

If you have any questions about this die system, please reach out to me or Mechele with TSD and we are happy answer them.

Happy card making!

Hugs,
Lynn

Filed Under: Paper Crafts

Creativity VS. Perfection

January 5, 2022 By Lynn Leusch 2 Comments

I recently took a watercoloring class at a local craft store using Art Impressions Stamps (Ai) and products. I was super excited to be learning from a friend who taught the class. I have known and followed Amanda Zibell’s teaching for a while and really enjoy her teaching style and artistry. We started learning the basic stamp and coloring steps and techniques and then used those techniques to create some basic projects.

As the class progressed, I was a bit frustrated with my artwork not looking the way I wanted it to look, because it didn’t look like Amanda’s great work. She is a wonderful cheerleader and applauded what I was accomplishing, but I wasn’t achieving the look I wanted.

During our teaching time together Amanda emphasized that she had only been doing watercoloring with the Ai stamps and tools for a few years, but spent a lot of time watching videos and practicing her technique on a regular basis. She indicated that she continues to compare her work to the amazing artistry of her mentor, the owner, designer, and true artist behind Art Impressions products, Bonnie Krebbs.

Bonnie is indeed amazing at what she creates and what she does. Watercoloring is in her blood and she has mastered her creative skill after a lifetime of practice.

In retrospect, I find it interesting that I, all too often, expect the status of perfection without practice. Bonnie and Amanda have years of experience and have put in hours of time to hone their craft skill. So, “Lynn” needs to do the same. Right? Right!

I am definitely NOT a perfectionist. So why did I expect it after that one class? Silly, I know. Have you ever felt that way as well?

What I Forgot and What I Re-Learned

I took this class with my BFF (Best Friend Forever), Sharon to learn how to watercolor so we could add it to our crafting repertoire. But more importantly, we took this class to spend time together doing what we both love to do and to have some fun.

Crafting brings me joy. I love making pretty things. I love sharing things I make with others.

I forgot to just have fun! I forgot that it’s fun to be creative and learn new things and that I need to practice a lot before I get better.

I re-learned that I don’t have to be perfect to be creative. I also re-learned that I need to stop comparing myself to other people’s accomplishments. And…I re-learned that being creative is and should always continue to be fun.

My best tips I could give anyone who is either new to the creative life or is a seasoned creative veteran:
Have Fun!
Don’t compare yourself to others’ skill levels.
You are already perfect at each step of your creative journey. So…just have fun!

Filed Under: Paper Crafts

Trio Of Cards Inspiration

January 4, 2022 By Lynn Leusch 1 Comment

Do you have cards you have made or collected over the years that are sitting in a box?

I have taught and taken oodles of card classes over the years. On top of that, I have also done a lot of card swaps as well. For those who may not know what a card swap is, it’s where multiple card makers make a designated amount of cards and swap them with others who have done the same. The receivers of these beautiful cards are able to be inspired by what others create.

That said, one of my goals in this new year is to take intentional action steps to organize and downsize my craft goodies. In that process, I came across my stash and collection of cards I have made, created, and swapped over the last many years. Let me just say that there is a very large container of beautiful cards that have been been sitting in my craft room and need to be shared with others.

I definitely know that there is a lot of work and love put into the process of making cards and have decided I want to share this hard work and love with all of you who come to my blog looking for inspiration. I will be taking pictures of many of the cards and sharing them with you, giving credit to the creator if they provided their name with their card.

As I share these it is my desire to point out some specific points of interest on the cards to offer simple tips that might offer you some ideas and to inspire you.

Flowers

Out of the many cards I had to select from I decided to showcase three flower themed cards. As you will see, these cards are beautiful yet when you dissect them and look at how they are made, you will see that they are easily replicable using the stamps, inks, cardtock and elements that you already have in your crafting stash.

Author: Unknown

Quick and Easy
Stamp or stencil background image on the top card panel.
Stamp focal images on top of the background image using a prominent color (the black ink on top of the yellow/gold honey come image is a great contrast).
Place (pop up) sentiment piece on the card front. This can be a basic cut piece of cardstock or as shown in this card, select a tag die to give a lovely accent.
The black button adds a nice finishing touch for the bow to be placed on.

Author: Unknown

Squares, Circles, and Flowers, Oh Yes!
This card has a nice combination of design features.
I love that they combined a background stamp with squares and the stiched circle die element which always offers a nice added feature. The simple flowers and quirky sentiment used make for a card that will surely bring a smile to the recipients face.

Author: Unknown

Beautiful Design Features – Easily Replicable
The background flower image was stamped and embossed with black embossing ink to make the flower image bolder.
The flowers could be colored with any coloring technique you desire.
Notice the rectangle stiching around the flower panel and how it gives a nice accent to the completed card.
The button and additional twine bow is also a nice accent, but the green bow by itself could easily make this card still stand out.
I especially like that the sentiment has detailed cutting. Of course you could use a die if the stamp has one available, but this sentiment was fussy cut around all the edges.
Accent features: a bit harder to see but just underneath the ribbon bow and sentiment there is a strip of black washi tape. Also the splatter of ink in a contrasting color adds a fun accent as well.

Your Turn To Create

I hope you are inpisred to use these design card sampes in your next card making projects.

Time That These Cards Are Enjoyed By Others As Well – They Will Get A New Home

For whatever reason, I have been hanging on to these beautiful cards in some cases, for years and it is time that others get to enjoy them as well. After they are posted, I have decided that in my efforts to organize and downsize a bit that these cards will be on their way to new homes.

There are many great service organizations and groups that accept cards to be donated for Veterans across the world and for Senior homes.

Filed Under: Paper Crafts

Hearts Of Gratitude and Love

January 3, 2022 By Lynn Leusch 4 Comments

Hearts of Gratitude Cards

On my journey to learning how to create digital images that can be used by creatives for card making, scrapbooking, and more this heart print was created.

I had seen a similar idea on Pinterest and decided that this would be fun to create with.

Each card showcases a different seasonal flower and unique flower technique.

Instructions

Each of these cards use a different flower die. It’s quite possible you have some flower dies you can use from your crafty collection. If you don’t have multiple flower set dies to choose from, then of course use the same set of flower dies for all four cards.

The heart printable is a one-page sheet that has four quadrants. One heart per quadrant. Each of the flower sets that are created are placed in the non-print area using a slight curve.

Cut each quadrant apart. This can be accomplished by using a paper cutter. As you can see from the images each of the hearts have been cut down so that they are small enough to add a back layer for color of your choice.

I enjoy using the A2 Card Layer Dies from The Stamp Doctor. They make the process of cutting precise multiple layers super easy. To use these dies for this project decide which two dies you want to use on top of your A2 card base, using a smaller die for the heart print and a larger one for the solid card stock.

Card One – Spring

These flowers were made by using colored cardstock. You could certainly make all three flowers out of the same color, but I chose to use three different colors as you can see.

Die-cut flower shapes using different colored card stock.
Die-cut flower stems and leaves.
Using a stylus, place flowers on top of a mouse pad and press in a circular motion to give dimension and shape to each flower.
Build your flowers by gluing them on top of each other from large to small – add pearl or embellishment if you desire.
In the blank area of the heart, adhere your flowers to your heart card panel in a curved shape. Use the left side of the heart shape as a guide for flower placement on the right side.
Add leaves/stems
Layer heart panel on top of the cardstock and then onto the card base.
Adhere (pop up) sentiment.

Card Two – Summer

These flowers are surprisingly fun to create by using paper towels. I was pleasantly surprised and happy with how they turned out. These flowers are fun and fluffy.

Die-cut flower shapes out of textured paper towels.
Die-cut flower stems and leaves.
Place flowers on top of each other and poke holes in the center of flowers – I used a colored brad to hold them together.
Sponge ink onto lower flower petals to add color to your flower.
In the blank area of the heart, adhere your flowers to your heart card panel in a curved shape. Use the left side of the heart shape as a guide for flower placement on the right side.
Add leaves/stems
fluff the flower petals with your fingers to give them more dimension
Layer heart panel on top of the cardstock and then onto the card base.
Adhere (pop up) sentiment (silly me – I took pictures prior to adding the sentiment – see group image for sentiment placement).

Card Three – Fall

Surprisingly these delicate-looking flowers were created by using colored tissue paper. As you may know, tissue paper is quite thin, so when you are working with these petals be careful to not tear petals. However, if one does tear, don’t worry, it can easily be hidden when fluffing the petals.

Die-cut flower shapes out the textured colored tissue paper.
Die-cut flower stems and leaves.
Place flowers on top of each other and poke holes in the center of flowers – I used a colored brad to hold them together. Note: I grouped my flowers to create three different-sized flowers to give my card some fun dimension.
In the blank area of the heart, adhere your flowers to your heart card panel in a curved shape. Use the left side of the heart shape as a guide for flower placement on the right side.
Add leaves/stems
Carefully separate the tissue paper petals to fluff flowers and give dimension.
Layer heart panel on top of the cardstock and then onto the card base.
Adhere (pop up) sentiment.

Card Four – Winter

The flowers on this card are made by using regular household aluminum foil. Yup! Such a pretty sparkly look by using something you likely already have in your kitchen.

Prior to die-cutting flowers, glue household foil on top of white card stock and press it down so it has a complete seal on the cardstock.
Die-cut flower shapes from the foil cardstock you made.
Die-cut flower stems and leaves.
Build your flowers by gluing them on top of each other from large to small – Stagger the petals on each layer – add pearl or embellishment if you desire.
In the blank area of the heart, adhere your flowers to your heart card panel in a curved shape. Use the left side of the heart shape as a guide for flower placement on the right side.
Add leaves/stems
Since these petals have a cardstock base it is easy to give them dimension.
Layer heart panel on top of the cardstock and then onto the card base.
Adhere (pop up) sentiment (silly me – I took pictures prior to adding the sentiment – see group image for sentiment placement).

Flower and Leaves Dies Used

Dies Used To Create Flowers

I hope you enjoy these easy-to-make cards using the My Heart print that can be found here.

These cards are a perfect way to express your love and gratitude and maybe sympathy, to your loved ones.

Filed Under: Paper Crafts

In The Beginning…Create Scout Was Born

January 2, 2022 By Lynn Leusch 2 Comments

My crafty roots come from my grandma. Grandma could easily make something from nothing like nobody’s business. I so remember her creating a variety of different types of crafts.

Sadly I don’t have many of the things grandma made because the family home burned down years ago, along with so many precious and priceless family memories. So I depend on my memory to keep those precious memories alive. As the years go by that isn’t always an easy task. LOL!

Inspired By Grandma

As I mentioned, grandma dabbled in many different crafting genres and as a youngster, I watched with awe as she created many pretty things. She always encouraged my sister and me to create alongside her.

Here are some of the fun crafting goodness genres I remember her creating:

Decopage
Mod Podge has been around since 1967 and grandma was a decoupage guru in the early days. At least in my eyes. I don’t remember when she started using this magical glue, but I remember watching as a youngster as she brought cut pieces of paper as well as other materials to life by gluing them in place to create fun decorations and home decor and bring a bit of beauty to our lives.

3D paper layering
This is probably my earliest connection and recollection to the term fussy cutting that I use in my paper crafting today. This art form was where grandma would take multiple prints of a picture and cut different pieces out of the multiple prints and pop them up to build a 3D image and then place them in a frame.

Sewing
Grandma taught me so much about making my own clothes. She was instrumental in helping me make many of my own outfits.

Tri-Chem Liquid Embroidery
I can still remember the smell of those paint tubes. Grandma would paint everything from pictures to towels, sheets, pillowcases – just about anything! There was a brief period of time that as an adult I was re-introduced to Tri-Chem and I signed up as a distributor. I think I did that as a way of bringing this fond memory to life again.

This old promotional flyer brings back some fond memories

I’m Thankful For My Crafting Roots

As a young adult, I continued loving all types of creative mediums just like I learned from grandma. Then one day I was introduced to the world of paper crafting. My mom and I discovered a scrapbook book and card-making store and Oh My Goodness our lives were changed forever.

Needless to say, if you are a paper crafter and reading this, you know exactly what I mean when I say…Holy Cow we had discovered something amazing.

Mom and I spent many years together enjoying this new craft genre together. Many hours of scrapbooking and card-making classes and more brought us so much time together.

As a side note, when mom passed away, I strayed away from paper crafting for a bit of time because it was quite painful to create with her mom by my side.

I will FOREVER be thankful for the world of crafting and all the precious memories it has brought me over the years. Both grandma and mom are now residing in heaven but they have both left me with some wonderful and precious memories and an amazing legacy for the love of crafting.

The Birth Of Create Scout

Moving forward a few years…

After working for 22 years as a County Employee in California I decided to retire and had an opportunity to work with a crafting company. As that crafting company grew, the company moved to Arizona and I was asked and honored to move along with them. This company was in the direct sales industry and I am thankful to have been the training manager and had the opportunity to teach, train, support, and educate our associates on the new products.

After several years in this position, there were some company transitions and I decided it was time for me to retire once again. However, this time I retired and decided to create something of my own.

Crafting and being creative are in my blood so I decided to start blogging using my love of crafting, specifically paper crafting. However, I took some time in deciding what name I wanted. That’s not always an easy task. One thing I’ve learned over the years is that I LOVE looking at the beautiful creations made by others. There are so many outstanding and artistic people in the world. I enjoy researching and learning new things. I’ve tried a variety of different creative techniques by learning from others.

I decided to combine my love for creativity and researching new and innovative ways to create new things. Thus…Create Scout was born.

That’s how it all began. Thank you for taking the time to read about my humble beginnings. But mostly thank you for allowing me to re-live and share some of my precious memories with you.

Creatively Yours,

Lynn

Filed Under: Paper Crafts

« Previous Page
Next Page »

Primary Sidebar

Recent Posts

  • Ways To Be Creative
  • Creative Decorating Tips From A 5-Year-Old
  • Playdough Playtime – Family Style
  • Glue Gun Essentials – Tips, Tricks & Hacks
  • One Sheet Wonder Valentine’s Day Cards

Recent Comments

  • Atlas_2022 on How To Read A Ruler
  • Glenda Cates on Creative Decorating Tips From A 5-Year-Old
  • Martha on Creative Decorating Tips From A 5-Year-Old
  • Tamara on Playdough Playtime – Family Style
  • Karen Sammer on Playdough Playtime – Family Style

AFFILIATE DISCLOSURE

Sometimes I make recommendations for books, journals, calendars, other products and resources. The link provided, in many cases, is an affiliate link. This means if you click it and purchase, I will earn a small commission when you take action on a recommendation but you will not pay more. I only promote things I personally use, test, and believe in.

Footer

Meet The Blogger

My desire to scout around and discover all forms of creative outlets has led me to introduce you to Create Scout. It takes so much time to discover and find new inspiration, so here at createscout.com, I will work hard to find and bring you the old, the new, the trendy and innovative ways to make pretty things.

Copyright © 2025 · Hosted by Mom Webs Hosting · Log in